Friday, May 11, 2018

Grandkids photo display plaque tutorial

Mother's day is this Sunday and I wanted to make my mom something special. I loved the idea of this photo display because she can change out the photo's if she wants as the kids grow or add to it. And I could make it to match her decor. 

What you will need:
1 wooden board or plaque. (This one was purchased from Joann's on sale for $5.99.  It measures                                                      6x24 and was found in their wooden crafts area.)
Paint (I used Folkart chalk paint in sheepskin and parisian grey with a coat of white wax on top. 
A paint brush
sanding block or sandpaper
Vinyl
A personal cutting machine (I used a silhouette cameo.)
Twine
A staple gun
small clothes pins
adorable pics of your kiddos! :)

This is what I started out with. 1 blank board:
I painted a coat of sheepskin on the entire plaque then I let that dry and painted over it with the parisian grey letting some of the sheepskin shine through in some areas for a distressed look. 
Once that was completely dry I took my sanding block and went around the edges lightly sanding off a bit of the grey to expose more of the sheepskin.
 
Then I took my white wax and painted it on wiping off the excess as I went with an old cloth diaper making sure to get in every crevice. This helps seal in the chalk paint and gives it a really nice finished look. 
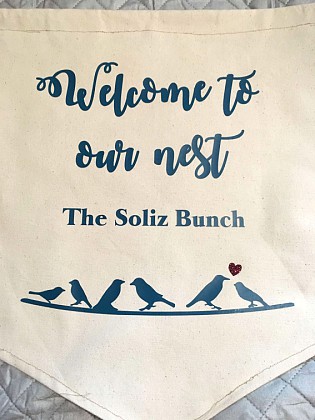
Then I opened up my Silhouette design studio and found the fonts I wanted to use. I make my screen the size of the area I am going to be placing my design so I can imagine better what the fnal product will look like and play with different arrangements. Once I settle on my fonts I rearrange them in whatever way saves me the most vinyl.  In this case I was using 2 different colors. 
Then I fired up my Cameo! Cut baby cut!
Once cut I weeded my vinyl and then using transfer tape I applied my vinyl to the plaque making sure I centered the words before pressing it all down for good because once it's stuck, it's stuck. 
to add the string I used a staple gun but that didn't seem to hold so what I ended up doing was using the staple to tie my twine around. 
Then to keep it in the spot I wanted it to stay i used a small piece of washi tape but this is totally optional. 
I used these mini wooden clothespins as the clips to hang the pics from
Add a picture hanger to the back and those adorable pics and you are all set! You can find a 5 pack of the hangers at Lowes for less than $2 here
Now I just have to wrap it up!! 
Happy Mother's Day!!!

Tuesday, May 8, 2018

Party of 6 sign

I found this adorable 8x8 block plaque at Hobby Lobby the other day and knew exactly what it's purpose would be. I've been wanting a sign with the number 6 on it for our family! I used my Silhouette design studio to create the file and cut it out of adhesive vinyl I purchased at Joann's. I choose to use teal because it matches the throw pillows in our living room. The little block is the perfect size for our mantle! I love this one so much I'm thinking of selling them in my shop in black. 

DIY Disneyland crafts and Travel goodies

Leading up to last years Disneyland trip I did a lot of crafting! I started out by making a countdown calendar. Each day the boys took turns clipping off a loop until the day finally arrived to leave!! I bought the big Mickey head at Michaels.  They had a whole section of Disney stuff just in time for our trip. I picked up some other crafts in that section for our 6 hour drive.  
I also made these autograph books for the little ones! I bought these chipoard covers at a local craft shop. You can find them on Amazon too. I filled them with colorful blank cardstock pages. The cover was just decorated with more scrapbook paper, ribbon and I cut a little adhesive vinyl to use for their names.  The buttons are stickers.  They enjoyed showing them to all the characters at Disneyland. But be prepared to stand in lines to meet them all. You are no longer allowed to just walk up to them any longer. 


I wanted the drive to be fun too since I knew it was going to be a long one. I bought these little cups at the dollar store and again used adhesive vinyl purchased from Joann's to personalize them.  They are completely washable. Just don't put them in the dishwasher.  Although truthfully we did it once and it survived but it was a total accident.


I made them these Travel books too. They got to decorate the covers with their own stickers. The inside has print outs with scavenger hunts, road trip bingo, word hunts, etc. They really were entertained the entire trip and no one complained. It was awesome!!


DIY matching family shirts for Disneyland!!!


Last summer our family went to Disneyland for our family trip! I wanted us to all have matching shirts so of course I made us some!! Since there is such a big span in ages of our 4 kids I decided to make them just a little bit different and add a little personality to each.  I bought us all red shirts at Walmart for less than $4 each!

 Joann's sells a ton of different character fabrics for easy personalization or you can use a pattern if you prefer.  My oldest son really wanted to have Star Wars so I found this really cool small print black and white print that worked perfectly! Some of the other fabrics I used I had as scraps from other sewing projects. I stayed in the black and white scheme for the heads. For the little kids and Dad we went with Pirates. We went the weekend that the final Pirates of the Caribbean came out so it was fitting! Of course since I'm the only girl mine had to be a sassy Minnie design. :)

I started out by picking out which fabrics to make the heads out of. I printed out this Mickey head and then traced it onto iron on fusing you can find on Amazon here: Thermoweb Heat and Bond
Then cut out each head, Iron it down in place so that it doesn't move around while you stitch around the edges for a finished look. Then I added any extra details. The heat Bond is strong enough to hold without sewing it but will eventually start to fall off after a few washes.  If you stich it down it will last forever!


 I used White Heat Transfer Vinyl I purchased from Happy Crafters here . I used my Silhouette Cameo to cut out the letters. Remember to Mirror your images BEFORE YOU CUT! Then I used a standard iron to apply the names to our shirts.

 We loved wearing our shirts for our amazing trip! The best part was whenever one of the characters at Disney would walk up to our kids they would address them by name! My little ones were blown away that some of their favorite characters, like Peter Pan would come and start a conversation like they were old friends! It really was the best!


We had so many people ask where we got our shirts and it was so fun to say "I made them!" Fancy Vacay shirts for a fractions of what they would have cost me.  I spent less than $25 for all 6 shirts!

Monday, May 7, 2018

DIY garden flag

I made this super cute Garden flag completely from scratch for our front yard and you can to!! Honestly the hardest part was making the point completely straight and even that wasn't so hard. 

What you will need:
*A length of Duck Canvas in whatever color you would like. Depending on the size of your flag pole you'll most likely need less than a yard.  It's very wide so with the half a yard I bought I will be able to make a couple. 
*Scissors
*Sewing Machine
*Ruler
*1 sheet of Heat Transfer Vinyl.  I purchase mine through Happy Crafters
*An Iron or Heat Press
*A Garden Flag Pole (Found at most stores.  I purchased ours at Joann's.


 I cut the duck cloth to make a 17x20 inch rectangle. 


To make the points I used chalk on the back side, found the center using a ruler. Made a dot. Then measure 4 inches up on each side and made another dot.  With my ruler I drew a line to connect the 2 dots.  Fold in half to make sure that your lines are even before you cut.  Then I folded up to sew a small seem all around for a finished look. At the top make sure you fold enough space to make a pocket for the pole to run through leaving both ends opened.

Should look like this:
I used Siser Heat Transfer Vinyl Purchased from Happy Crafters. I made the design using Silhouette studio inspired by one I saw on Pinterest. I found images of random bird silhouettes online and arranged them on a line I created. I made their sizes vary ever so slightly to represent our 4 kids.  But you can use whatever design you prefer or just words!
Once the vinyl was cut, I weeded it and arranged it onto my flag. Make sure you remember to mirror before you cut when using HTV!! 
Once It's all layed out follow the instructions on your HTV packaging to apply with your Iron or Hot Press.  I used my Cricut Heat Press. This HTV was Hot or Cold Peel so I just waited for it to cool a bit before pulling the carrier sheet up.

And viola! Our new beautiful flag all set to hand out front! It's been out a week and I can't tell you how many compliments I've gotten already!


 What should I make next?


Monday, April 16, 2018

Nick's high school graduation party 2015

Our first born son graduated from high school last year! So of course we had to throw him a party! 😉 I had a lot of fun planning it and even more fun celebrating with our friends! Of course we had to start with the invite. I already had this in my shop, loved it so decided we would go ahead and use it! It is one of my biggest sellers in the spring! 

The favors were an obsession of mine!! First of all we had to find 25 glass baby jars which was not easy. My cousin totally came through for us and gathered them from friends. We washed them, took the labels off and all the sticky glue. 

I made a card box for him and wanted it to look like his cap.  It is now a memory box with little things from his senior year, grad night & party. I had everyone sign a copy of the Seuss book Oh the places you'll go.
We had a lot of guests and it was a very hot day. 105 degrees!!!! So we rented tables with umbrellas for shade. We have a big back yard so it worked out perfect!

My hubby hung lanterns everywhere!!! 😊
Nick and his cake table. Behind it I hung all of his school pictures from preschool to graduation.
We made superlative labels for our guests to fill out and either put on as name tags or on their cups.  Some of the answers were hilarious but I didn't get many pictures. :(
We made these superlatives labels users could fill in. 
I made these labels for the favors and centerpieces.

These were wooden numbers I picked up at Walmart and covered with cardstock.
Even the drinks had tassels!! We used mason jars for glasses.

The cake was from Sam's club!! 
The centerpieces were old spaghetti jars I painted with chalk paint to use as vases. 

I used his diploma and awards as decorations for the mantle.  The tassel garland I made out of plastic table clothes.

Also on each table and around the party were different poses from his senior portrait sitting.

Highlights of the decor.  The best part is the college he is now attending has the exact same school colors so I can save everything and repurpose it in the future!!